Most computer users use the standard window manager of their operating system that is built to be accessible for newcomers. They are quite happy with it, but only because they don’t know about time-saving tiling window managers like XMonad.
There is rule of thumb in programming that if you program something similar twice, you should think about extracting the common code, but no hurry. If you programm it three times, then you should definitely consider doing it. The same is true for activities that you repeat over and over: The more you repeat them, the stronger you should consider to automate them. Dragging windows around to arrange them for specific tasks is such an activity that can be easily automated with XMonad; “easily” if you know how to configure it.
I rather prefer an app to be in fullscreen as much as possible and have apps arrange themselves. And i prefer to work as much as possible with the keyboard, because i believe that this is more efficient than using a mouse. If you are like me, you definitely need a tiling window manager XMonad is a fast and light-weight manager of this kind for the X Window subsystem used in Ubuntu and other Linux distributions.
[More: How to install XMonad?][xmonadinstallPage]
You can get going with basically no configuration
-- minimal XMonad configuration: ~/.xmonad/xmonad.hs
import XMonad

myConfig = def
  { modMask = mod4Mask -- set 'Mod' to windows key
  }

main = xmonad myConfig
and use the preconfigured keyboard shortcuts. But if you are like me, you like to customize things to make them more beautiful and more efficient for your workflow.
To configure XMonad, you have to know Haskell. Learning Haskell as a programming language is a years-long journey and requires dedication. Fortunately, you can configure XMonad with just a few basics, which are easy to learn and concise to write.
With this website i’d like to teach you how to configure XMonad using just enough Haskell to read and write an XMonad configuration file.
Important XMonad concepts
Why is it called XMonad?
XMonad is written in the Haskell programming language and also uses it as its configuration language. This gives you powerful constructs based on a strong mathematical foundation and the many advantages of Haskell. Most notably, Haskell is famous for its use of Monads, which is a construct to simulate side-effects (like writing text to the terminal or opening a file) when all functions are pure. XMonad defines a monad calledX for the X Window System, therefore the name “XMonad”.
What is the difference between screens, workspaces and windows?
| Concept | Note |
|---|---|
| Screen | A real, physical device like your desktop monitor or your laptop monitor. |
| Workspace | A “virtual screen”. You can have many of these even though you may only have a single physical screen. |
| Window | A rectangle area that uses some part of a workspace to show apps. |
The window manager XMonad, as the name suggests, manages windows. That is, when an app needs to be shown, XMonad reserves a rectangle area on the screen, called a window, in which the app is shown. However, XMonad decides at which position and at what size this window is placed.
Because the screen space of a single or even two monitors is very limited, XMonad uses the concept of “virtual screens”, called workspaces, to increase the available screen space to as much as you need. XMonad allows you to decide how many workspaces you need, to decide which windows to put on which workspaces in what window arrangement, called layouts. It also allows you to decide which workspace is shown on which physical screen and to quickly switch between workspaces and layouts using keyboard shortcuts.
What are mod-keys?
These so-called modifier keys, Mod1, …, Mod5 are names for for special keyboard keys.
| mod-key | Keyboard key |
|---|---|
Mod1
|
Normally the left ALT key. |
Mod2
|
Normally the Numlock key. |
Mod3
|
Normally undefined. |
Mod4
|
Normally the left or right Windows key, also called Super key in Linux. |
Mod5
|
Normally the “ISO_Level3_Shift” key. |
You can run the xmodmap terminal app to find out to which keyboard key is assigned to which mod-key in your linux distribution. The output should look like:

In XMonad there is a so-called standard mod-key, called Mod on this website. It is used in many of the built-in keyboard shortcuts, which have the form Mod+…. This mod-key is normally set to the left Alt key, but you can change it.
[How to change the standard mod-key.]
What is a (Haskell) package?
A package is a bundle of highly related Haskell code files that you download and install as a single unit. For example, thexmonad package contains the bare minimum of everything you need to get XMonad up and running and sufficiently configured. The xmonad-contrib package contains extended configuration helpers for special use cases and to make your configuration easier to write.
XConfig, XMonad’s main configuration
In order to configure anything and everything in XMonad we fill our desired settings into its main datastructure: XConfig.
data XConfig l = XConfig
  { normalBorderColor  :: String
  , focusedBorderColor :: String
  , terminal           :: String
  , layoutHook         :: (l Window)
  , manageHook         :: ManageHook
  , modMask            :: KeyMask
  , keys               :: (XConfig Layout -> M.Map (ButtonMask,KeySym) (X ()))
  , borderWidth        :: Dimension
  , logHook            :: (X ())
  , startupHook        :: (X ())
	-- ...
  }
This is (a part of) the definition, the skeleton so to speak, of all the settings you have to set up in order to create a valid XMonad configuration.
[How to understand, initialize and change a Haskell datastructure.]
You normally don’t build the XConfig structure from the ground up, because this would require a lot of work for you that other people have already done. Instead you use a premade structure, that has sensible default settings for your linux desktop environment, and modify a relatively small number of settings: those you aren’t happy with. This premade, fully configured structure is called def, which stands for “default” and which you will see in almost all examples on this website. You view its source code here
On this website we show you how to change the most frequently used settings, listed in the previous code snippet, to get you started. However, you can find the full list of changeable settings on the XConfig’s documention page.
modMask
Define the keyboard key that you want to use as your so-called standard modifier key Mod, or mod-key for short.
[What are mod-keys.]
The name Mask may be confusing and can be considered a leaky abstraction, because you as a user don’t care that this functionality is implemented with a bitmask. So simply read the word Mask as Key.
By default Mod is set to the left Alt key, but you can change it to the Win key like many XMonad users do as follows:
--- Inline definition
myConfig = def
  { modMask = mod4Mask -- win key
  }
However, it is wiser to introduce a readable name for the mod-keys as follows:
--- External definition
windowsKey = mod4Mask
leftAltKey = mod1Mask

myConfig = def
  { modMask = windowsKey
  }
The reason is that you may forget what mod4Mask stands for after some time and that you may forget to update the comment when you try different mod-keys.
[How to set up and modify keyboard shortcuts.]
[How to find out which mod-key is which keyboard key.]
Since the modMask setting is represented by a KeyMask value, you can only choose one of the values found in the docs:
| Key value | Explanation |
|---|---|
noModMask
|
Use this value if you don’t want to use the mod key at all. |
shiftMask
|
The left or right Shift key. |
controlMask
|
The left or right Control key. |
mod1Mask
|
Normally the left ALT key. |
mod2Mask
|
Normally the Numlock key. |
mod3Mask
|
Normally undefined. |
mod4Mask
|
Normally the left or right Windows key, also called Super key in Linux. |
mod5Mask
|
Normally the “ISO_Level3_Shift” key. |
terminal
Define the terminal app that you want to have opened in a new window whenever you press the built-in keymap Mod+Enter.
Since the terminal setting is a String, you have to provide the app’s name in double qoutes. For example, the default terminal app in Ubuntu is named gnome-terminal and you would set it up as follows:
--- Inline definition
myConfig = def
  { terminal = "gnome-terminal"
  }
Thus, whenever you press Mod+Enter, a new gnome-terminal window is opened. You can set the mod-key to a key of your choice with the XMonad’s modMask setting.
Other nice terminal apps are:
keys
Define keyboard shortcuts, called “keymaps” for short. With keymaps you can for example rearrange your windows, start an app or run a script.
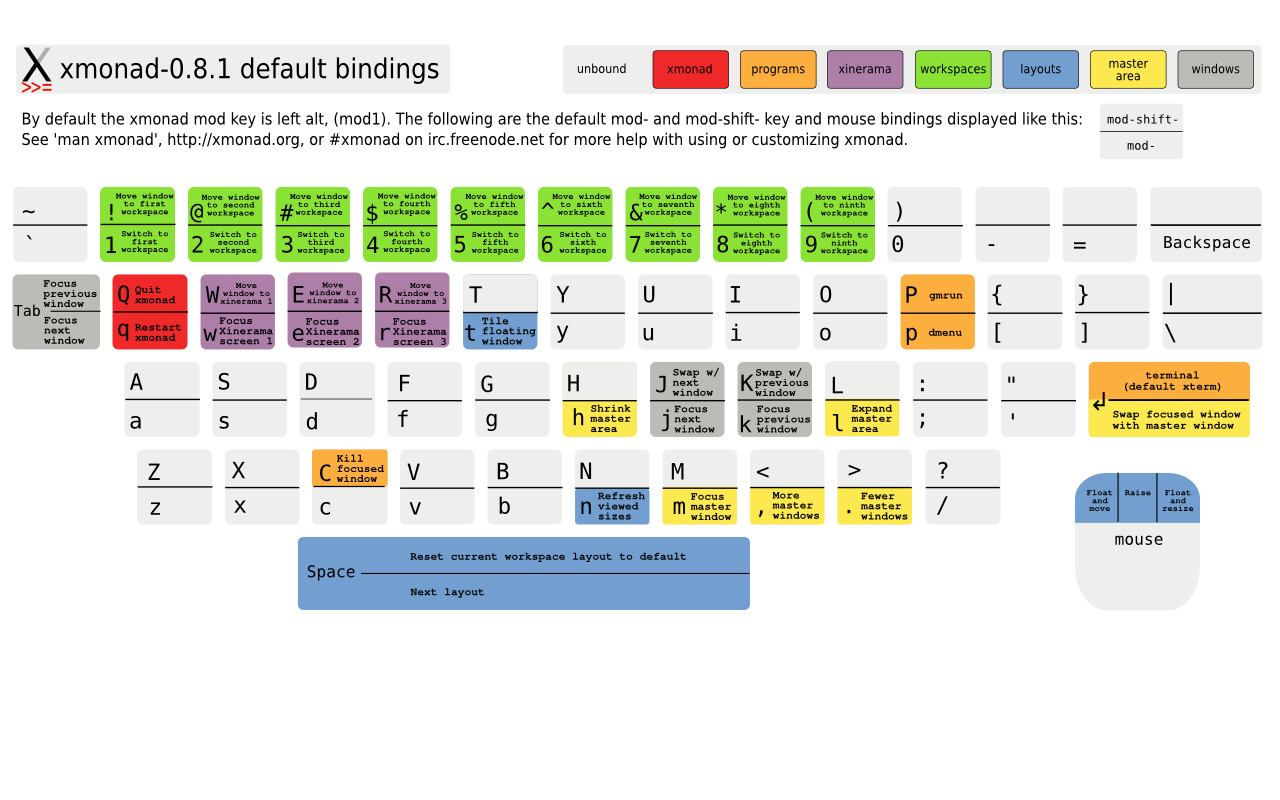
[The built-in keymaps cheatsheet.]
Technically, a keymap is pair of a key combination to trigger an action and the action itself. Since the keys setting is a
XConfig Layout -> M.Map (ButtonMask, KeySym) (X ())you will need to write a Haskell function.
[How to write a Haskell function.]
Briefly, the arrow symbol tells you that this must be a function that expects a XConfig Layout value and returns a M.Map (ButtonMask, KeySym) (X ()) value.
XConfig Layout: An existing XConfig value whose other properties like workspaces you can access for your keymaps.M.Map (ButtonMask, KeySym) (X ()):M.Map: A Haskell mappings representation which contains your keymaps. It’s a collection of mappings from key combination to an action.(ButtonMask, KeySym): The triggering key combination as a pair of one special key and one normal key that should trigger an “XMonad action” when pressed to together.ButtonMask: A special key like Ctrl, Shift and Windows. It’s a synonym forKeyMaskthat you know from setting up the modMask setting, so it allows the same key values.KeySym: A normal key like a letter or digit.
X (): An XMonad action like starting an app or changing the layout of your windows.
For example, you could define keymaps yourself as follows:
import qualified Data.Map as M

-- External definition
myKeysFunc baseConfig@(XConfig {modMask = modKey}) = M.fromList $
 [ ((modKey, xK_Return), spawn (terminal baseConfig) )
 , ((modKey, xK_q),      restart "xmonad" True)
 ]

myConfig = def
  { keys = myKeysFun -- override previous keymaps
  }
The keymaps in this example are built-in, so wouldn’t want to define them yourself.
[How to write your own keymaps in detail.]
Briefly, myKeysFunc is our chosen function name that we set as the keys setting. baseConfig is our name for the XConfig value that will be passed to our myKeysFunc function, which we extract the modMask property from. With the @ symbol we use Haskell’s as-pattern notation to give a name to the full XConfig value and with XConfig {modMask = modKey} we use pattern matching to extract the modMask value from the given baseConfig value. We use modMask value locally under the name modKey.
[How to access and change a Haskell value.]
With M.fromList we create a Data.Map value. This function expects a list of
( <key-combination>, <action>)pairs, where key-combination itself is a
( <special-key>, <regular-key>)pair. With the bracket [item, item, ...] notation we create that list.
[How to write lists in Haskell.]
The fromList function is available though the import line at the top. [How to import functions from other modules.]
The xK_Return value and the xK_q value are XMonad’s representations for the Enter and q keys. The spawn function runs a given String value. Here, we start an the terminal app that is set in the terminal property of the given baseConfig value. We access this property with terminal baseConfig, because terminal is also an accessor function.
[How to access properties with accessor functions.]
This example deletes and overrides all built-in keymaps in def and introduces the two keymaps Mod+Enter to open a terminal in a new window and Mod+q to restart XMonad. If you don’t want to delete all existing keymaps, take a look at short example.
xmonad-contrib package, which is regarded by many as shorter to write, and easier to read than the standard notation. This notation is called EZ and is inspired by the way your configure keymaps in the famous Emacs and Vim editors.[How to write keymaps EZly.]
workspaces
Define the names/identifiers of workspaces. The default ones are named:
defaultWorkspaces = ["1","2","3","4","5","6","7","8","9"]If you choose to use a [statusbar like xmobar][xmobarPage], which you definitely should, these workspace names will appear in your statusbar to indicate which workspaces contain windows and which one you are looking at.
If you don’t need that many workspaces or want more meaningful names you can change them as follows:
-- External definition
myWorkspaces = ["1:work", "2:browser", "3:chat"]

myConfig = def
  { workspaces = myWorkspaces
  }
However, when you change workspace names/identifiers, you will also need to update your keymaps in your keys settings, because the default keymaps for switching to a certain workspace or moving windows from one workspace to another look for the default workspace names "1", "2" etc.
[How to setup your own keymaps.]
startupHook
Define actions to be executed right before the start of XMonad.
import XMonad.Util.SpawnOnce (spawnOnce)
import XMonad.Hooks.SetWMName (setWMName)

myStartupHook baseConfig = do
  return () -- workaround for checkKeymap!
  checkKeymap baseConfig myKeys -- check keymaps from EZ notation
	-- workaround to integrate Java Swing/GUI apps into XMonad layouts;
	-- otherwise they just float around.
	setWMName "LG3D"
	-- workaround to keep xmobar/dock visible after xmonad restart; otherwise
	-- the dock can be lost/hidden behind wallpaper.
  spawn "xdotool windowraise `xdotool search --all --name xmobar`"
  spawnOnce "dropbox start"
  spawnOnce "nm-applet"
	spawnOnce "~/.xmonad/xmonad-starthook.sh"
  -- ...

myConfig = def
  { startupHook = myStartupHook
  }
Here, you should check your user-defined keymaps if you used the EZ keymap notation, place your workarounds if necessary, and start apps you would like to have available from the beginning. For example, you can start the Dropbox daemon, or Ubuntu’s network-manager nm-applet (You can also start these apps through a shell script, which you run here with the spawn function). The difference between the two spawn functions is that spawn in myStartupHook will run anytime you restart XMonad, whereas spawnOnce will only the run the first time you start XMonad but at a later restart. This is what you usually want for background daemons.
manageHook
Define what should happen when a new window is opened. This allows you to treat an app different from others, for example, place it on a special workspace or let it float (above all other windows).
import XMonad.Hooks.ManageHelpers (isDialog, doFullFloat, doCenterFloat, transience')

myWorkspaces = ["1", "2", "3:social"]

myManageHook = composeAll
  [ className =? "stalonetray"         --> doIgnore
  , isDialog                           --> doCenterFloat
  , className =? "Gimp"                --> doFullFloat
  , className =? "Thunderbird"         --> doShift "2"
  , fmap ("Firefox" `isInfixOf`) title --> doShift "2"
  -- move transient windows like dialogs/alerts on top of their parents
  , transience'
  ]

myConfig = def
  { manageHook = myManageHook
  }
The composeAll function allows us to write our desired hooks as a list. A hook consists of a trigger (left side of --->) that inspect a new window see if some “xproperty” of that window matches (with =?) some given String, and an action (right side of -->). Note that the matchings are done in the order of your list. You can run the terminal app xprop and then click on a window like Firefox to find out the xproperties of that window. The long output looks like:
...
WM_CLASS(STRING) = "Navigator", "Firefox"
WM_ICON_NAME(STRING) = "xmonad | the tiling window manager that rocks - Mozilla Firefox"
_NET_WM_ICON_NAME(UTF8_STRING) = "xmonad | the tiling window manager that rocks - Mozilla Firefox"
WM_NAME(STRING) = "xmonad | the tiling window manager that rocks - Mozilla Firefox"
_NET_WM_NAME(UTF8_STRING) = "xmonad | the tiling window manager that rocks - Mozilla Firefox"
For example, you can combine this app with the terminal app grep as in
xprop | grep WM_NAMEto only show the output lines you care about.
In the following we list some useful matching helper functions, as well as window actions:
| Matching | Note |
|---|---|
manageDocks
|
If window is a dock, reveal it but let it manage/position/size itself. Don’t use this anymore. Use the docks function like in the example instead. |
isDialog
|
Is the window a temporary “pop up” dialog? |
appName
|
First entry in “WM_NAME(STRING)”. Like in the Firefox example, this name may not really be the app’s name. Then try className instead.
|
resource
|
Same as appName. Don’t use this anymore!
|
className
|
Second entry in “WM_CLASS(STRING)”. |
title
|
Identical to “WM_NAME(STRING)”. For example, in Firefox it includes the currently visible webpage title so use this fmap/isInfixOf construction from the Data.List module.
|
transience'
|
Move dialogs to the parent’s workspace. For example, if Firefox is on workspace “2”, but you are viewing workspace “1”, a Firefox dialog like the Password-dialog would open in you current workspace “1”, but with transience' it opens on “2”.
|
| Action | Note |
|---|---|
doIgnore
|
Do nothing, let the window manage/position/size itself. |
doFullFloat
|
Stretch the window to cover the whole screen and let it float (above all other windows). |
doCenterFloat
|
Let it float (above all other windows) with its own size but position it in the center of the screen. |
doShift
|
Move the window to some workspace, for example “2”. |
You can read about all matching helper functions and actions in the documentation.
layoutHook
Define the layouts, that is, the windows arrangement styles that you want XMonad to have available for you to cycle through with Mod+Space, the default keymap to select the next layout.
[How to build your layoutHook.]
normalBorderColor, focusedBorderColor
Define the color of the border around a window.
Since each color is a String you write a color code surrounded with double quotes. There are two styles to write a color code. First, you can use the universal RGB hex notation.
"#<red><green><blue>"For example you can set:
-- Inline definition
myConfig = def
  { normalBorderColor = "#010D21"
  , focusedBorderColor = "#0080FF"
  }
In XMonad each color uses two hex digits. However, this is hard to read after some time, so it is wiser to write it like this:
-- External definition
myBlack = "#010D21"
myBlue = "#7F0303"

myConfig = def
  { normalBorderColor = myBlack
  , focusedBorderColor = myBlue
  }
The windows borders then looks as follows:

To find the specific hex values for the color of your choice you can use any color picker such as Google’s.
The second style to write a color code is to write the plaintext name from the list of X11 color names. Of course not every color has such a name, but if you are happy with these standard colors, use them, because they are a lot more readable. For example, you can write
myConfig = def
  { normalBorderColor = "Black"
  , focusedBorderColor = "Dark Cyan"
  }
borderWidth
Define the width of the normal and focused window border in number of pixels. Since the width is represented by a Dimension in XMonad which is just another name for a non-negative integer number, you can set it like this:
--- Inline definition
myConfig = def
  { borderWidth = 2
  }
Try some pixelsizes to see what is as small as possible but still visible at your screen size.

How to organize your config file
Your XMonad configuration file consists of normal Haskell programming code and as such you should treat it like any programming code: keep it as clean and readable as possible so that your future self and possibly others may appreciate your code and may be able to read it, modify and learn from it.
Some good rules of thumb are:
- Use an explict or qualified import for less-known modules like
XMonad.Config.Gnome, but use the normal, unconstrained import for popular and widely known modules likeXMonad.Layout.NoBordersor the necessaryXMonadmodule. Otherwise you may forget where a function came from after some time. - Put
myin front of any value’s name that you configure yourself likemyConfig,myKeys,myBlueetc. in many of the examples. This helps you to easily distinguish what is self-configured from what is not. - Put
basein front of any variable’s name that comes built-in with XMonad likebaseConfigin many examples of this website. - You can add a single qoute
', pronounced “prime” in this context, to any value that is just a small variation of another value. - Write parts of the config that change more frequently higher to the top of the file. You may probably change/add keymaps more often than workspaces and these more often than your terminal app. This way you will have to scroll less when you edit your file. (You can also use “folding markers”
{{{..}}}to have collapsible code sections when you use a text editor like Vim or Emacs.)
Learn more about Haskell
I highly recommend the following tutorials and books if you want to dive deeper into Haskell programming:
Bartosz Milewski Tutorials
Bartosz is probably the best teacher on Haskell and Category Theory (the mathematical foundation of Haskell) subjects. Most notably, he publishes everything for free. You can find many interesting videos on his Youtube channel like his introduction to Haskell, where he builds up your intuition about complicated concepts like “Recursion”, “Functors” and “Monads”, which you need in order to understand more difficult books and blog posts. I especially like his explanation of Monads. Also, if you are curious, take a look at his introductory blog posts about Category Theory.
CIS194
This is not a book but a university course, whose lecture notes and excercises are available online. These notes are highly recommended by many Haskell learners for its fast pace and clear writing.
Programming in Haskell (Graham Hutton)
This book is very nice if you want to dive more into the theory of Haskell programming. You should read it as your third or fourth book, because it may be too theoretical if you have a practical problem to solve. It will teach you a better way to think about concepts like “Recursion” to structure your program, how to think about and understand what a program does, and it will introduce to a programming style to construct (small) programms that are 100% correct by design.
Malte Neuss
Java Software Engineer by day, Haskell enthusiast by night.